| |
||||||||||||||||
| |
|
|
|
|
|
|
|
|
|
|
|
|
|
|
|
|
| |
|
|
|
|
|
|
|
|||||||||
 |
|
|
||
| |
||||
| |
||||
| |
|
|
||
| |
||||
Tutorial
One - |
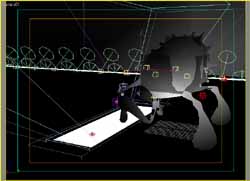
NOTE: This tutorial assumes RPManager or RPManagerLite is correctly installed. Also, with version 3.1 and 2.1 of RPManager the free and evaluation licenses support up to 2 passes only, so this tutorial will be modified somewhat in the future. You can download a screen capture of this tutorial being completed here.( 1.8meg zip, quicktime format) Download and open this scene, your perspective viewport should look something like this:
In the RPM interface click the '+' button to add a pass. You can also add a pass from the 'Passes' menu.
When you add a pass the pass name is automatically highlighted for editing, enter the name 'Background' for the pass name. Screenshot Optmise the interface a little by clicking the small '-' button positioned just below the Add Pass button - this will hide some items we do not need for the moment. Screenshot (you can also resize the pass list) We will now add the background elements to our 'Background' pass so that only those elements are rendered in this pass. There is already a selection set assigned to the background and floor elements, we will use this. From the 'Visibility Sets' menu, pick the 'Import Selection Sets...' item. In the dialog that opens check the item in the list and hit the 'Import Checked' button. Right Click on the area of the pass name in the 'Visibility Sets' column of the main pass list, and from the Assign a Visibility Set submenu pick the BG_and_floor set we just imported. This assigns the visibility set to the pass - you can see the visibility set column reflects the assignment - and the pass is isolated.
Next to assign a set to the creature: First, unhide all objects, then add another pass using the Add Pass button. Name it 'Creature'. Select the object named creature in the viewport (the spikey thing with legs) and Right Click in the visibility set column of this new pass - pick the first item, 'Create Visibility Set'. This brings up the create visibility set dialog. The set is automatically named to the pass name and highlighted for editing. The default options are what we want - created from selected objects and assigned to the current pass - so either hit the 'Create' button or if the name field is still highlighted you can use the 'Shift-Enter' short cut to OK from there. This creates the set and assigns to the pass. (Note it did not isolate the pass, this is an option in the create visibility set dialog and its default setting is controllable via the global defaults.) Confirm that both sets are correctly assigned by clicking first on the Background item in the pass list, and then on the Creature item. You should see the each pass isolated as you select the pass name. NOTE: 3.1+ and 2.1+ versions will not create more than 2 passes. To continue with the tutorial it might make sense to delete the background pass we created as the volume light information is still useful: Our last pass to add in this tutorial is the volume
light pass - there is a volume light assigned, and we want it to
appear on only one new pass, and some hold out meshes to also block
the light: With them still selected RC in the visibility sets column and create a selection set from selected objects - this time turn on the 'isolate set on assign' option in the create dialog so when created the pass is isolated. Assign a completely black material to both objects, there is one in the ME already (it helps to assign a new wire color to cloned instanced objects to make it clearer, in wireframe view, what is currently visible). We need to control the volume light per pass. Activate the 'Background' pass by clicking on it in the pass list. Turn off the active checkbox for the volume light. Do the same for the 'Creature' pass. The atm reporting in the pass list reflects these changes. Do a preview of the passes as they stand by clicking on the Preview/Checked button in the bottom left of the interface. This will preview all passes and then load the previews along with alpha channel into Ramplayer (scene info stamping and preview history are off by default and will be covered in a later tutorial). Screenshot. Note that the volume light pass is incorrect - we need to include the floor as a black object as the light should not be seen below the ground plane. Close the ramplayer. Select the Volume Light Pass in the pass list to restore it. Unhide all objects and select the floor object, clone as instance and assign the black material we used before. RC in the volume lights Visibility Set column, and pick the 'Add Selected Objects to Visibility Set' item.
Click on the Preview/Selected button in the bottom left of the interface to preview just the current pass that we have modified. It now looks correct. Next we will setup the output ranges. The background
pass needs only be a single frame. The other two need to both be
the active
time range. Next to setup the output files and output formats.
In this scene the production renderer has never had the output set so there is no need to set the main render dialog to a dummy output file. Next, use the Auto Path
generation of RPM to build some output paths (note the auto path
generation references an unencrypted maxscript function you can
customise to your own needs)
Create a new empty directory (and enter it), pick the targa output format, and hit the 'Save' button. You will be asked for the output format for the images, set to 32 bit premultiplied if not already and OK. Passes have been set for each pass, and we will use the Output Inspector to check them. From the Output Menu pick 'inspect output paths/format'. This brings up this dialog. Using this dialog you can edit output paths (entering a path that does not exist automatically creates that path if possible), as well as edit the output parameters of each pass. For this tutorial we will set the background pass to 24 bit - select the background pass in the lower 'output setup' listbox, and RC on the '32' under the bit depth label. Set to 24 bit. Screenshot. Close this dialog when done.
We only want one server assigned
to the 'Background'
pass
since
it is
a single
frame,
and will
use the Network controls to set this.
Now check a single server in the server list, this will be the only one assigned to this pass. (note you can RC here for some checking shortcuts). The other two passes are still set to global which is using all servers which is what we want. Click on them in the pass list to restore to visibly confirm if you like. We want to identify this job on the queue when submitted - 'background' and 'Creature' is not terribly descriptive when working on many jobs at once. Rather than adding to the length of each pass name, we will use use the global pass prefix to enter a unique name that will be prefixed to each pass when submitted to the network queue. Enter 'TutorialOne' in the 'Prefix' field below and to the right of the main pass list. Screenshot. (note the layout of the Network controls has changed slightly in the 1.95 version you can download). Press the 'Alerts' button in bottom right of the RPM interface, this brings up this dialog listing the current alerts. We have not tailored the alerts to our scene, so move this dialog to the side (it can be resized smaller) and change to the Warnings tab in the RPM tab interface. In the 'Output size warnings' press the 'Get Current' button (this retrieves the current output size and uses that). Also turn off the 'single frame' warning and all the multipass warnings, then press the 'Recheck Scene' button in the Alerts dialog. This leaves us with just these alerts which are fine - they indicate difference in frame ranges which is what we want. In the bottom of the RPM interface press the Net Submission/Checked button. This displays the Submission dialog (very similar to the alerts dialog and also allows rechecking of warnings). We have already checked our warnings so press the 'Net Submit' button in the bottom left of the dialog. Assuming the manager can be found he submission takes place, and you end up with this. Press the 'Open queueman' button, connect to the manager in queuemonitor and you should see your passes submitted. Screenshot. That's it for this tutorial. After you passes have rendered composite them together in your package of choice.
|